
In CollectiveAccess (CA) code, Providence can manage « site pages » in the Pawtucket2 part but are not well known by users. This is a concrete example of how to use them and (optional) customize the top menu bar with a drop-down list.
This tutorial is tested for CollectiveAccess 2.0.9 but may work with earlier and later versions.
Suppose you want to add some site pages such as « Contribute », « Terms of use », « Contact », « About », etc., in the public site (Pawtucket2). You can manage these pages apart from content relating to the collection base itself. In Providence, it’s possible to manage « site pages » that allow you to edit the content of these pages directly in Providence (instead of editing them « by hand »).
This functionality is documented in this old user guide (actual user guide of CA is not yet completed).
Template files
« Template files » (.tmpl) are already present in default install in the Pawtucket2 directory /themes/<your_theme>/templates and you don’t have to create one, excepting if you want a custom template.
The existing template files are: about.tmpl and staffpage.tmpl.
Remark: about.tmpl is not to be confused with the « About » default page… which is edited by hand in /themes/<your_theme>/views/About/Index.php. To avoid confusion, I suggest to rename the file about.tmpl by simple_page.tmpl (for example). Every time you change or add a template file, you’ll need to relaunch the caUtils script to update templates (see after).
The about.tmpl template is:
|
1 2 3 4 5 6 7 8 |
<div class="row"> <div class="col-sm-12"> <H1>{{{title}}}</H1> <h2>{{{subtitle}}}</h2> {{{bodytext}}} <div><em>Viewed {{{page_view_count}}} times </em></div> </div> </div> |
It defines 3 fields in this site page: title (of the page), subtitle (if needed) and the bodytext of the page, that can accept « rich text » format.
The field page_view_count will be replaced automatically by Pawtucket2, but you can remove this line if don’t want to display counting if visitors.
First thing to do is executing the caUtils script to scan existing templates:
- Open a terminal windows and go to the Pawtucket2 directory /support/bin
- Execute:
php -f caUtils scan-site-page-templates
or:
sudo ./caUtils scan-site-page-templates - This will give you:
CollectiveAccess 2.0 (204/GIT) Utilities
(c) 2013-2019 Whirl-i-Gig
Scanning templates for tags
Added 2 templates; updated 0 templates
This command parses the Pawtucket2 templates directory and add them in the database.
Create « site pages »
At this point, you can go to Providence MANAGE > Content Management interface:

Choose the desired template page (here simple_page) and click « + ».
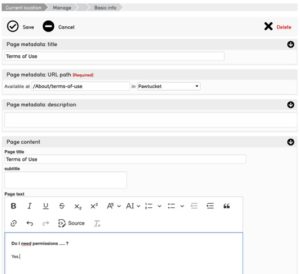
Here you can name the site page, like « Terms of Use ».
In the « URL path » field, why I choose something like « /About/terms-of-use »? Because I would like a menu « About » with drop-down list toward site pages, like for the « Browse » menu.
So you can create other pages like « Contribute », « About the collection » (where you can move the content of the actual « About » page). And so on. Do not forget to set the Access to « accessible to public ».
The tutorial could end here if you just want to create site pages. But what I would like is for all of these pages to be grouped into an « About » drop-down menu in the top navigation bar.
Make a drop-down menu
In Pawtucket2, go to directory /themes/<your_theme>/views/pageFormat and create a new file named aboutMenu.php containing this:
|
1 2 3 4 5 6 7 8 9 10 |
<span style="color: #000000; font-family: courier new, courier, monospace;"><li class="dropdown active" style="position:relative;"> <a href="#" class="dropdown-toggle mainhead top" data-toggle="dropdown">About</a> <ul class="dropdown-menu"> <li><a href="https://complete-url-to-your.site/index.php/About/Index">About</a></li> <li><a href="https://complete-url-to-your.site/index.php/About/terms-of-use">Terms of Use</a></li> <li><a href="https://complete-url-to-your.site/index.php/About/contribute">Contribute</a></li> <li><a href="https://complete-url-to-your.site/index.php/About/contact">Contact</a></li> </ul> </li> </span> |
Each <li>…</li> line will add a new list item in the drop-down menu, so you can give a custom link pointing to where-you-want with the title you want, in the order you want. In this example, the « About » link points to the default « About » page; other links point to « site pages » created with the Content Management interface. Adapt this part as you like.
In the same directory /themes/<your_theme>/views/pageFormat , edit the pageHeader.php file. You have to insert the call of aboutMenu.php somewhere to make it appear in the navigation bar.
Search the following part and add the line #3:
|
1 2 3 4 5 6 7 8 9 |
<span style="font-family: courier new, courier, monospace;"><ul class="na<span style="color: #000000;">v navbar-nav navbar-right menuItems" role="list" aria-label="<?= _t("Primary Navigation"); ?>"> <li <?= ($this->request->getController() == "About") ? 'class="active"' : ''; ?>><?= caNavLink($this->request, _t("About"), "", "", "About", "Index"); ?></li> <?= $this->render("pageFormat/aboutMenu.php"); ?> <?= $this->render("pageFormat/browseMenu.php"); ?> <li <?= (($this->request->getController() == "Search") && ($this->request->getAction() == "advanced")) ? 'class="active"' : ''; ?>><?= caNavLink($this->request, _t("Advanced Search"), "", "", "Search", "advanced/objects"); ?></li> <li <?= ($this->request->getController() == "Gallery") ? 'class="active"' : ''; ?>><?= caNavLink($this->request, _t("Gallery"), "", "", "Gallery", "Index"); ?></li> <li <?= ($this->request->getController() == "Collections") ? 'class="active"' : ''; ?>><?= caNavLink($this->request, _t("Collections"), "", "", "Collections", "index"); ?></li> <li <?= ($this->request->getController() == "Contact") ? 'class="active"' : ''; ?>><?= caNavLink($this->request, _t("Contact"), "", "", "Contact", "Form"); ?></li> </ul></span></span> |
If you decide to remove « Contact » and « About » default pages because you created new ones into « site pages », you can remove the lines #2 and #8. You can also move the aboutMenu.php after the Collections button.